


Part 1. How to Free Resize/Move Partitions
Move/Resize Partition is capable of changing partition size and location in Windows with ease. It helps:
1.Enlarge a small partition or shrink a large partition in Windows which does not contain "Extend Volume" and "Shrink Volume".
2.Extend or shrink a FAT partition in Windows Vista, Windows 7, Windows Server 2008, etc.
3.Extend a partition to the left contiguous unallocated or free space.
4.Extend a primary partition to contiguous free space.
5.Move unallocated or free space to be contiguous to the partition we want to extend.
6.Move a certain partition where bad sector exists to a safe place.
Move/Resize Partition contains 3 operations – shrink partition, extend partition, and move partition.
Step 1. Launch Partition Manager software to get its main interface.
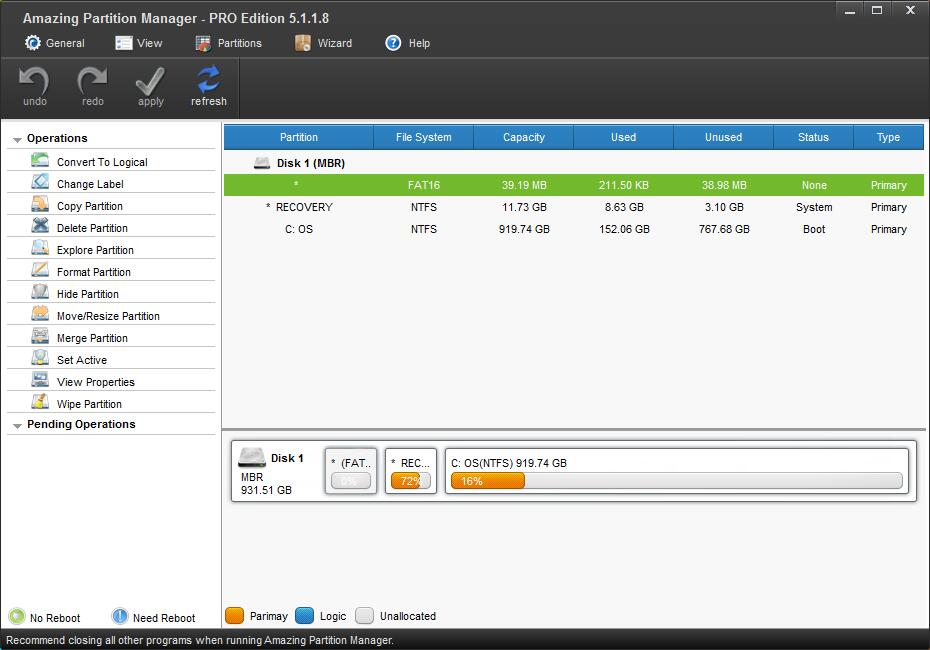
Step 2. Select the partition we want to operate and activate "Move/Resize Partition" from the left function list or from toolbar to get the following interface.
Step 3. A partition bar is shown here. The blue area represents partition size while the blank area means unallocated space. Do the followings and click "OK" to go back to the main interface.

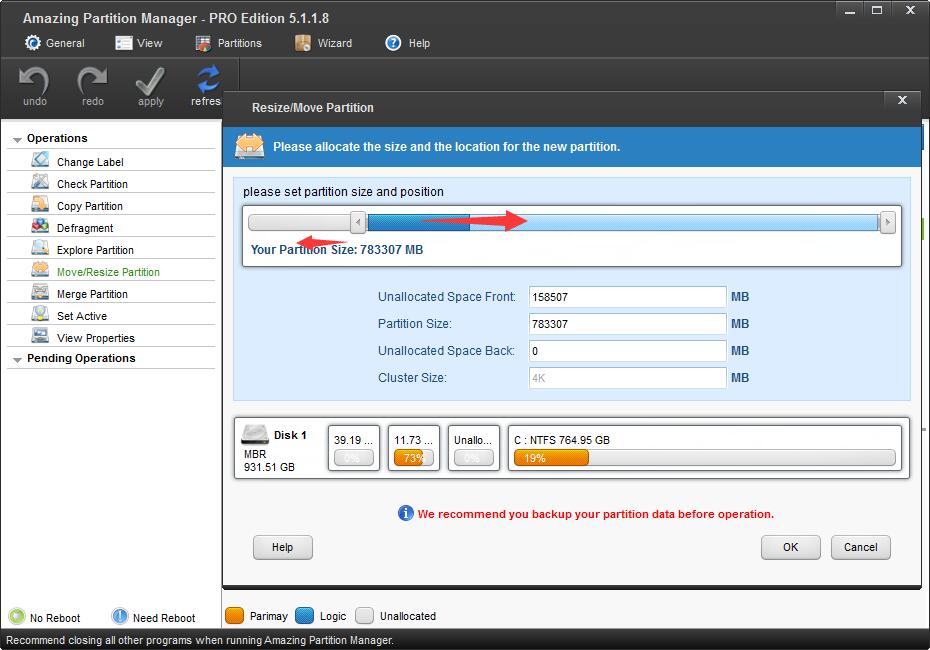
To shrink a partition, shorten the handle by dragging the triangles.
To extend a partition, lengthen the handle to occupy more unallocated space.
To move a partition, drag the whole partition towards unallocated space.
Step 4. Please click "Apply" button on the top left corner to apply the change.
Part 2. How to Delete Partition
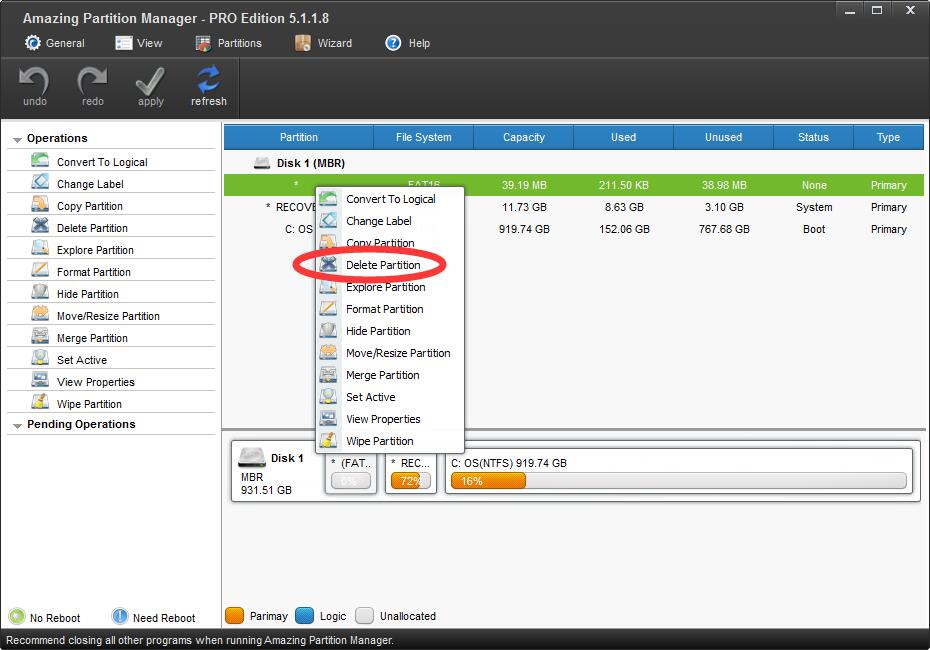
Step 1. Choose a preferred way to activate partition deleting feature among the listed ones
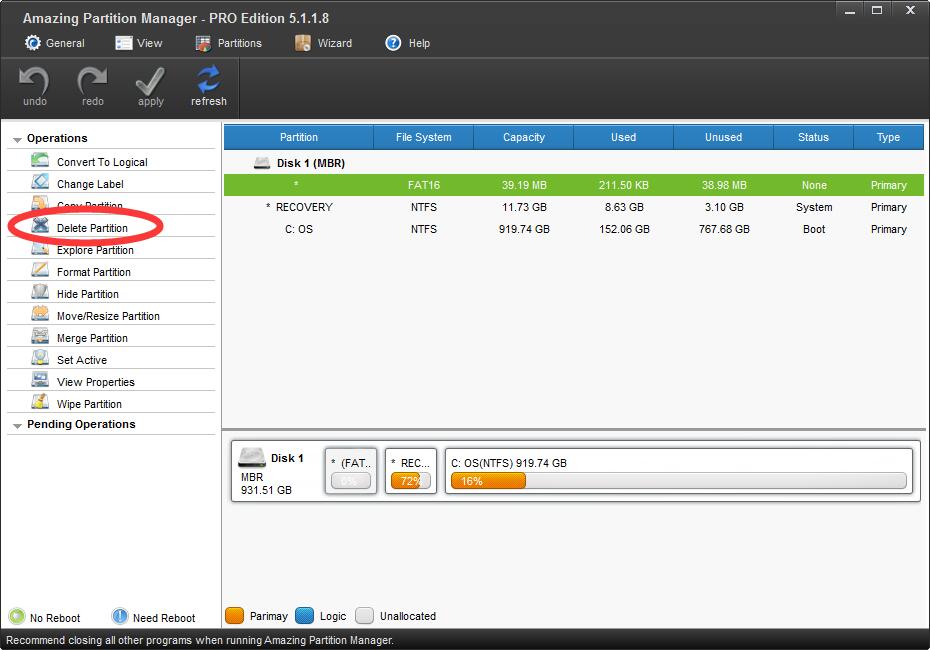
Case 1. Choose target partition and then click "Delete Partition" from left action panel.
Case 2. Select partition to be removed from the disk and click "Partition" > "Delete".
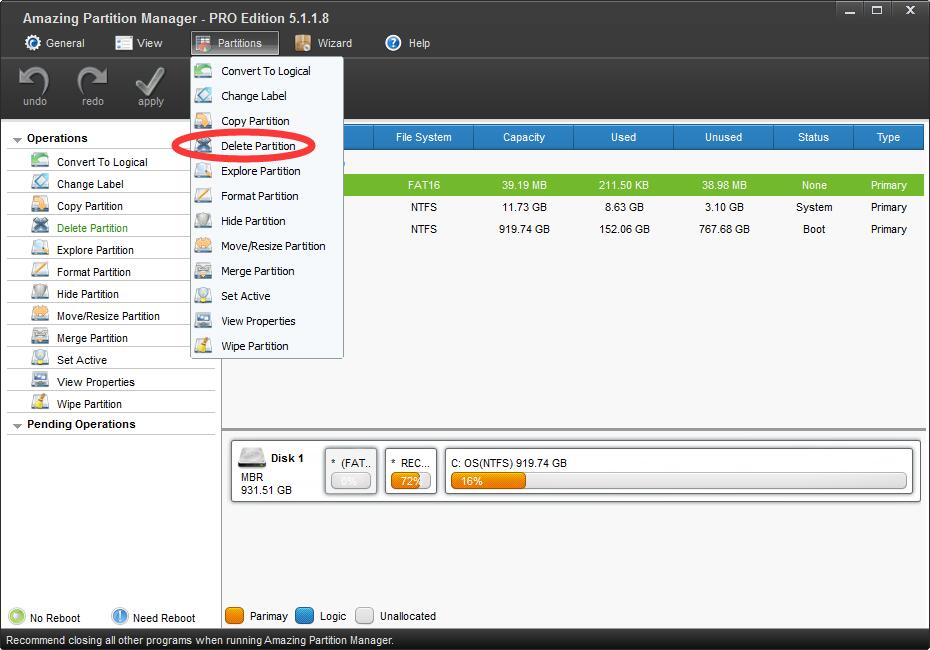
Case 3. Right click target partition and click "Delete" from pop-up menu.
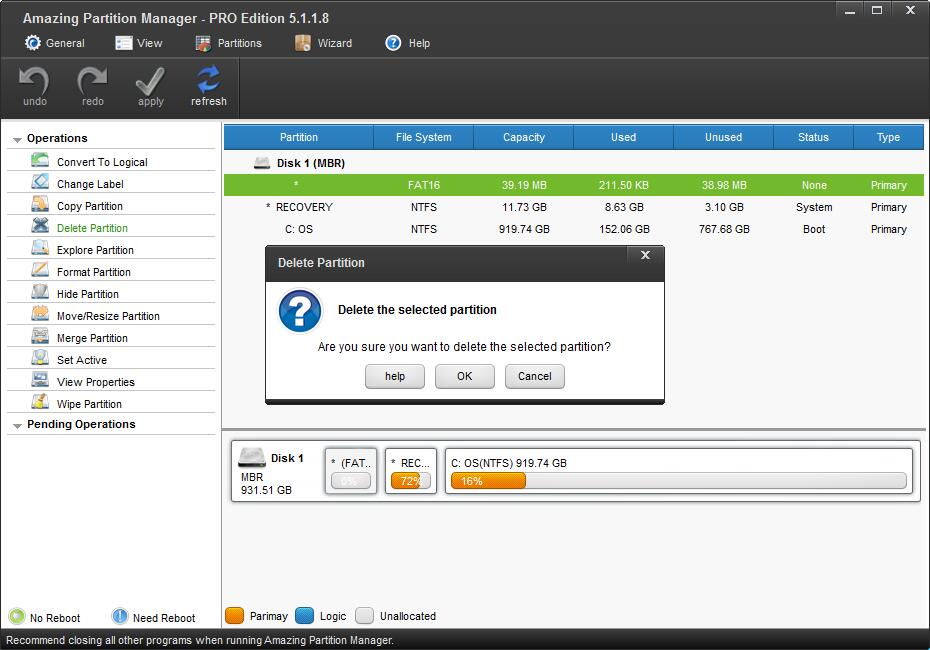
Step 2. We will get the warning window after clicking "Delete Partition" button. At this time, click "OK" button to let the software perform deleting operation.
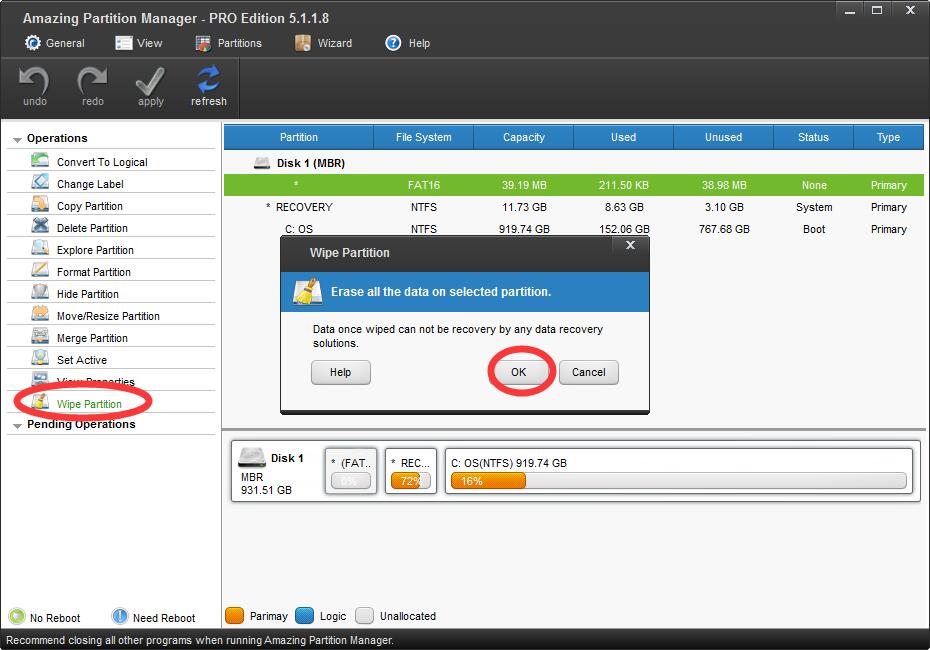
Part 3. How to Wipe Disk/Partition
Wipe Disk/Partition can destroy all information in your chosen disks safely and permanently. This function can ensure the security of your private and unwanted data and prevent someone from recovering your data. Once the Wipe operation is carried out, the data will not be recovered by any data recovery software.
Select the disk which needs wiping and choose "Wipe Disk" from the left action panel or from the right-click menu.
Part 4. How to Copy Partition
Copy Partition feature copies all data information from one partition to another without any data loss and in simple operations.
Step 1. Select the partition which needs copying and choose "Copy Partition" from the left side or choose "Copy" from the tool bar. Take partition E for example.
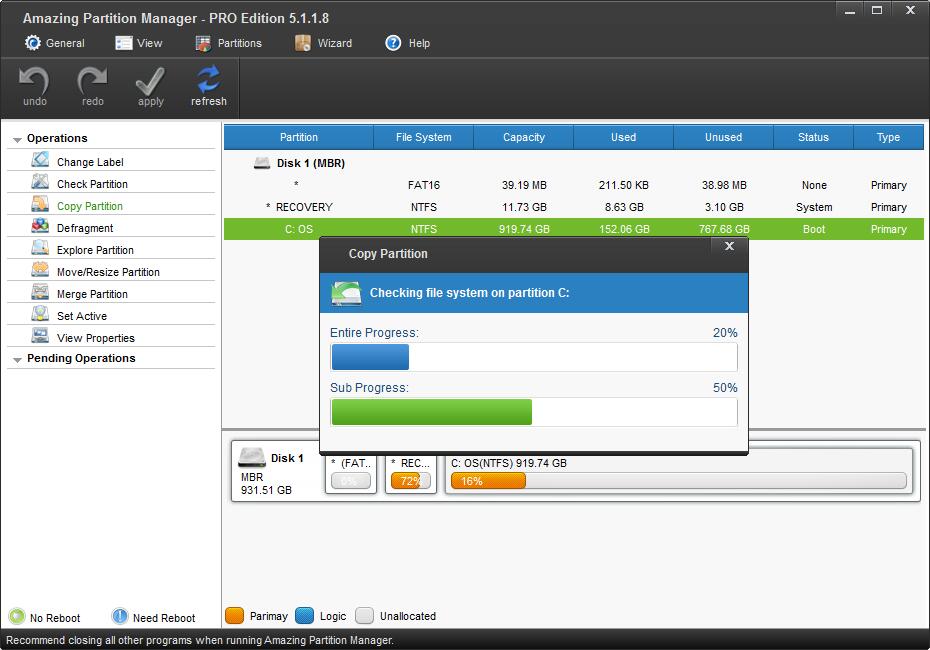
Step 2. Choose an unallocated space from partition list to save the copy of the selected partition and click "Next". Note: unallocated space should be large enough to hold all data on the source partition.
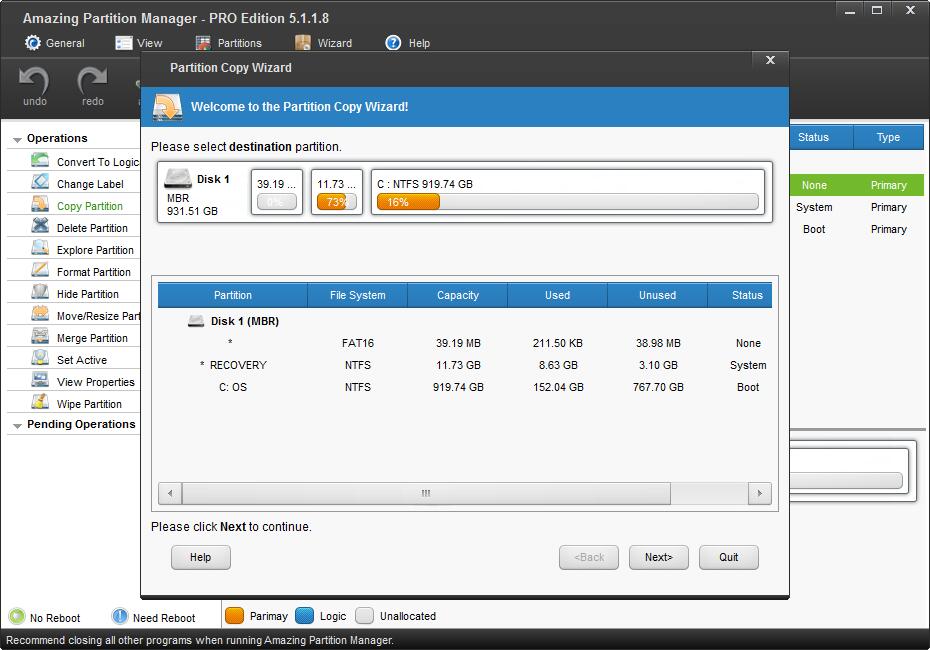
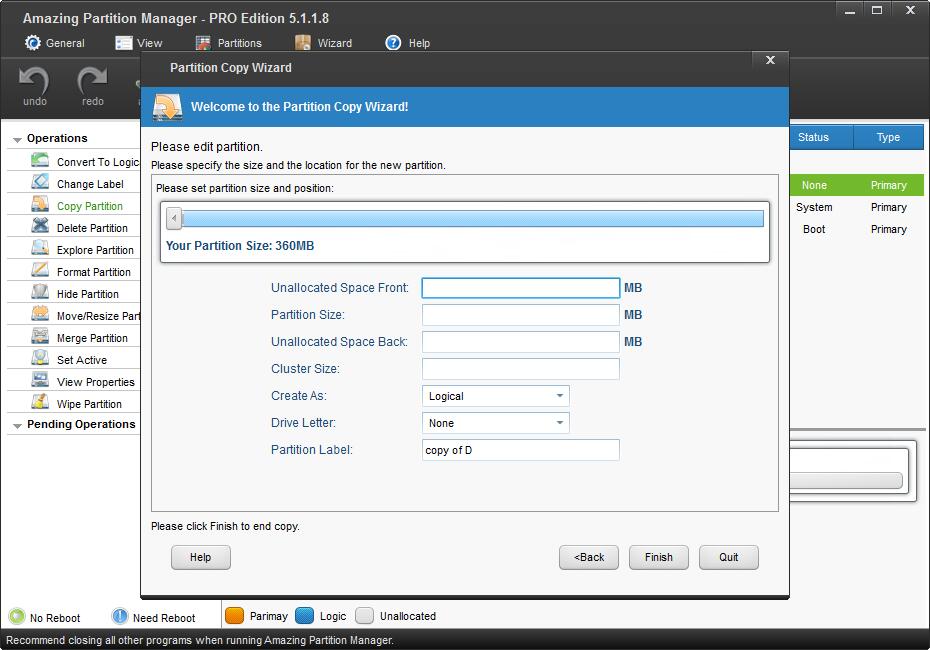
Here, we can see the option "Copy the partition with resize" which is checked by default. Keep it checked if you want to change partition size.
Step 3. Lengthen the rectangle bar to enlarge a partition or shorten it to shrink a partition. Then, click "Finish".
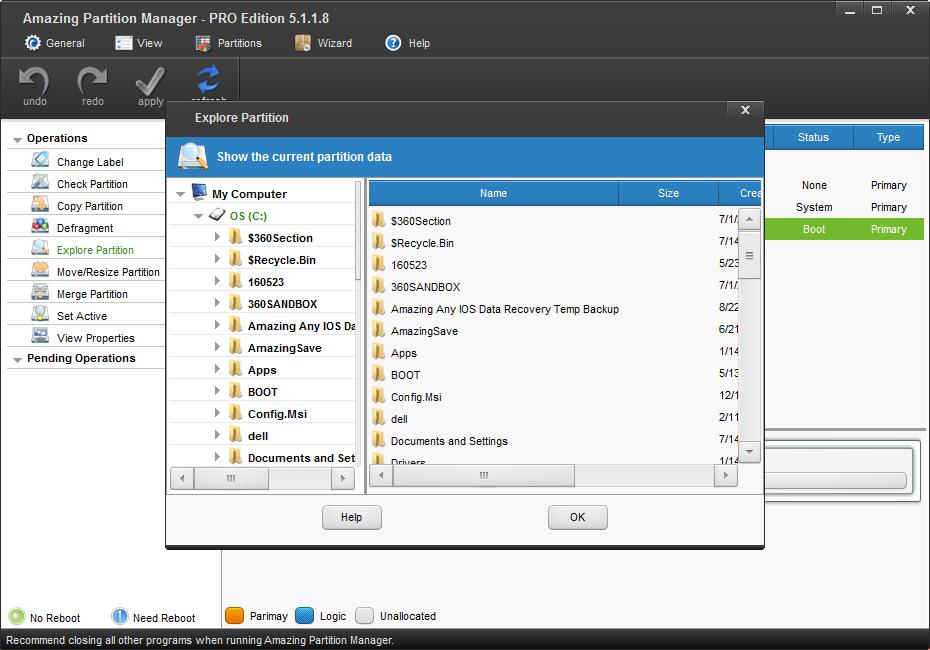
Part 5. How to Explore Partition
Explore a partition to ensure that it is the one you want to modify.
Select the target partition, and then click "Explore Partition" from action panel. This software lists files size, creation time and modified time as a tree view in this interface.
Part 6. How to Change Partition Label
Partition label is an optional name assigned to a partition to help users identify a certain partition. Although partition label is not necessary, it can make it easier to keep track of what data is stored on each partition. Once you find the data are not matched with the partition label (for instance, the partition which is used to store working data is named game), you can change it.
Step 1. Select or right-click the target partition, and click "Change Label" from the Operations group of the left action panel or click "Change Label" on the toolbar or click "Change Label" from the right-click menu.
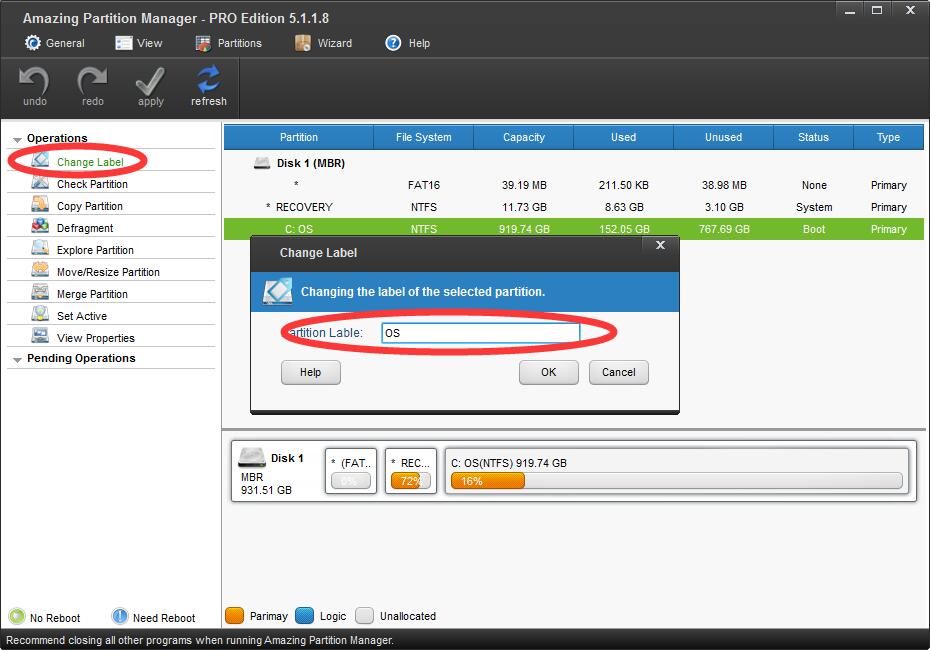
After that, a dialog box will emerge. Now, you can change the label for the selected partition, and then click "OK" button to go back to the main interface. Finally, click "Apply" to execute all changes.
Part 7. How to Recover Lost Partition
Partitions may get lost or disappear due to one of these factors: mistaken deletion, virus attack, wrong ghost, sudden power outage, incorrect partitioning, and so on. Partition Recovery is a quite good solution to partition loss, which can recover lost data at the same time as long as new partition hasn't been created.
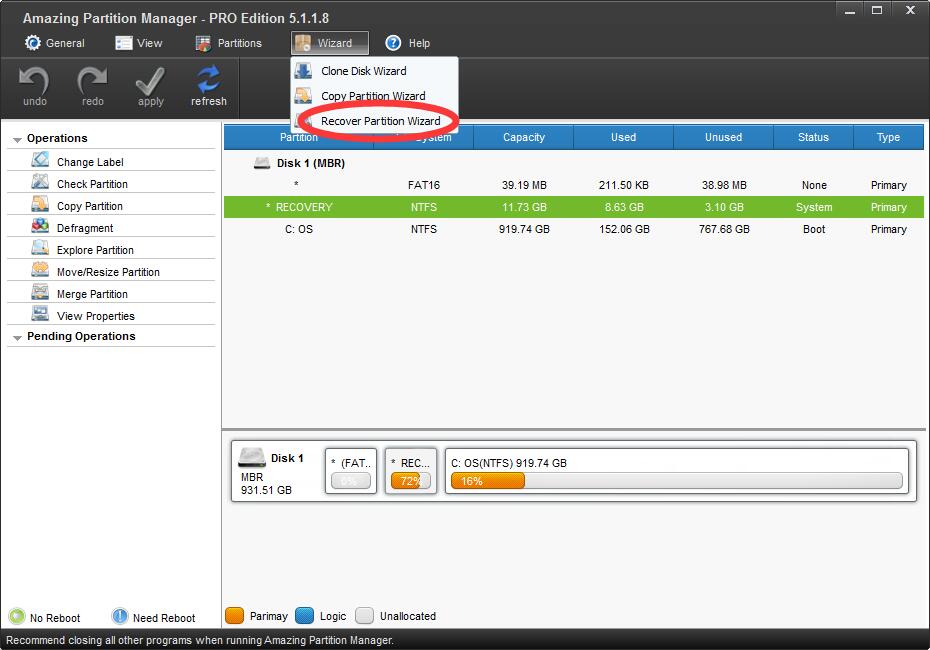
Step 1. Select the disk where partition loss appears and directly choose "Wizard" > "Recover Partition Wizard" to get the following interface:
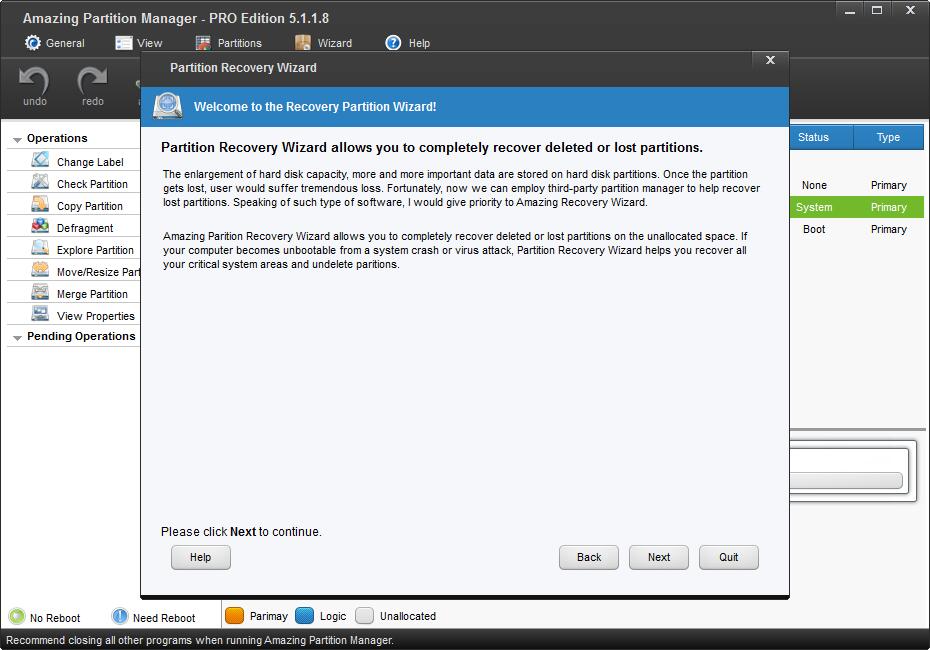
Click "Next" button to continue.
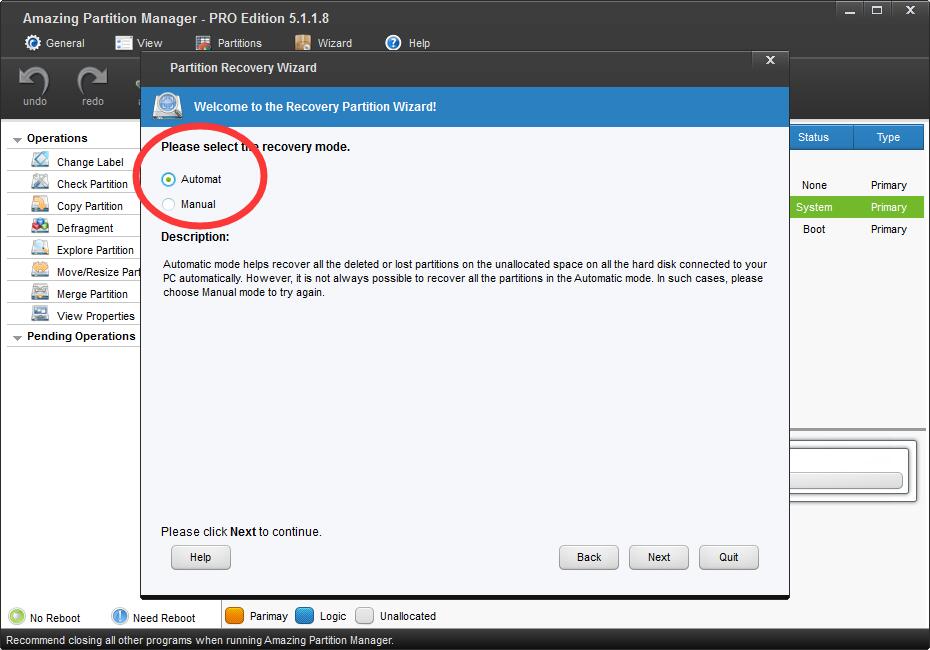
Step 2. Set scanning method to scan the specified range and click "Next"
Step 3. Check all needed partition, including existing partitions and deleted/lost partitions, and then click "Finish" button to go back to the main interface. Click "Apply" button on the top to perform partition recovery.
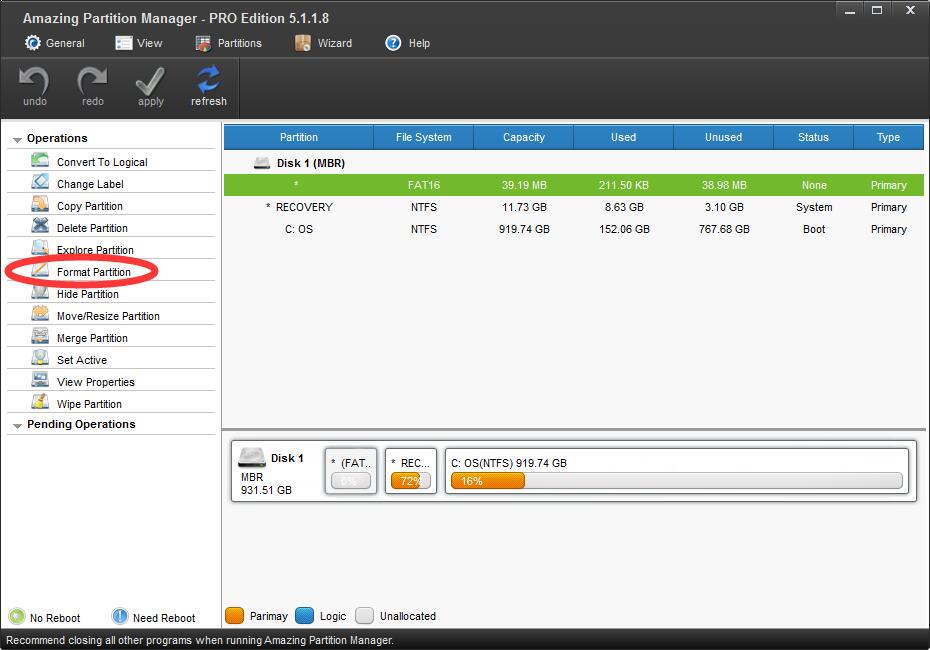
Part 8. How to Format Partition
Select the partition which needs formatting and choose "Format Partition" feature from the left panel.
Next, set partition label, file system and cluster size for the selected partition and click "OK".
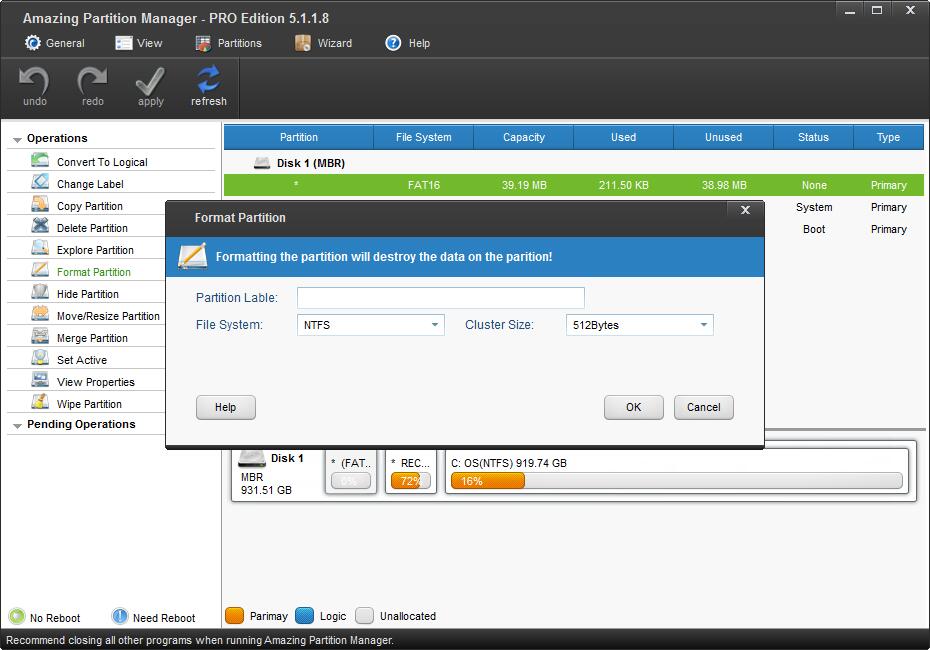
Now you can preview the formatted partition. If it is satisfying, please click "Apply" button on the top to apply the change.
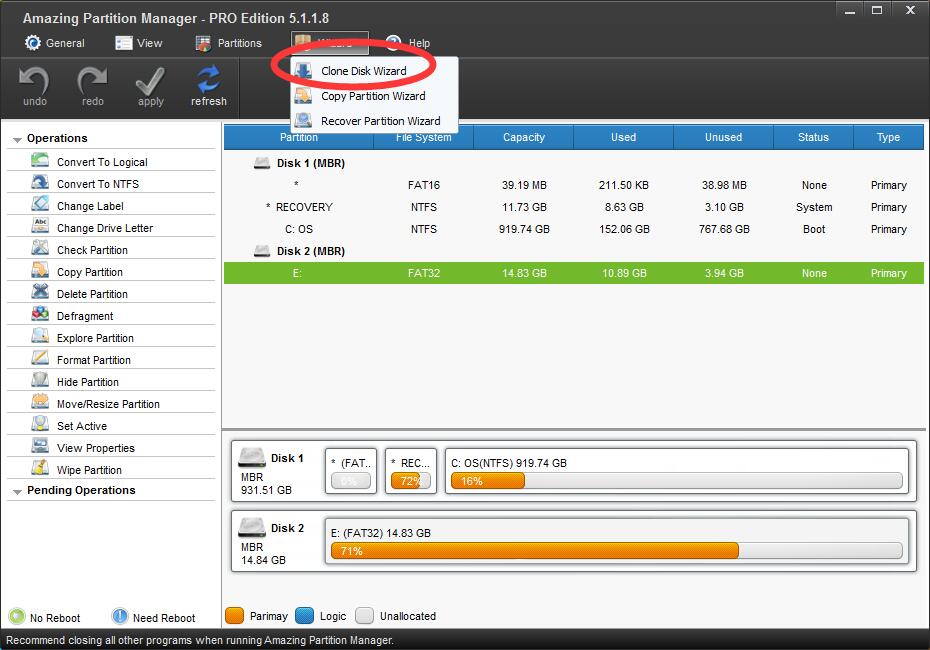
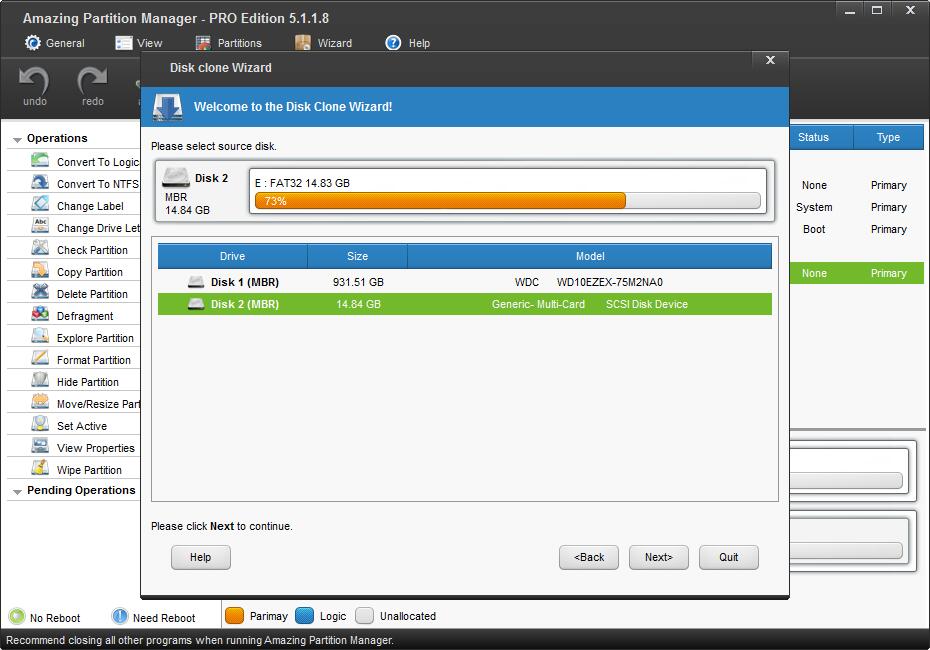
Part 9. How to Copy Disk
Step 1. Select the disk which needs copying and activate Copy Disk function from one of 3 places boxed by red line. Here, we choose "Wizard" > "Clone Disk Wizard" to get the following interface:
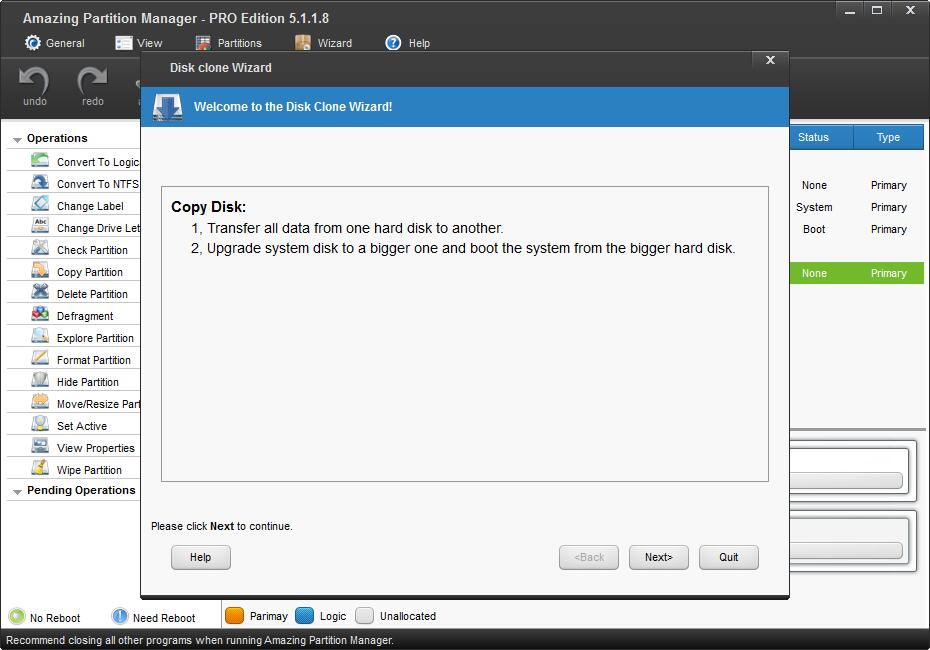
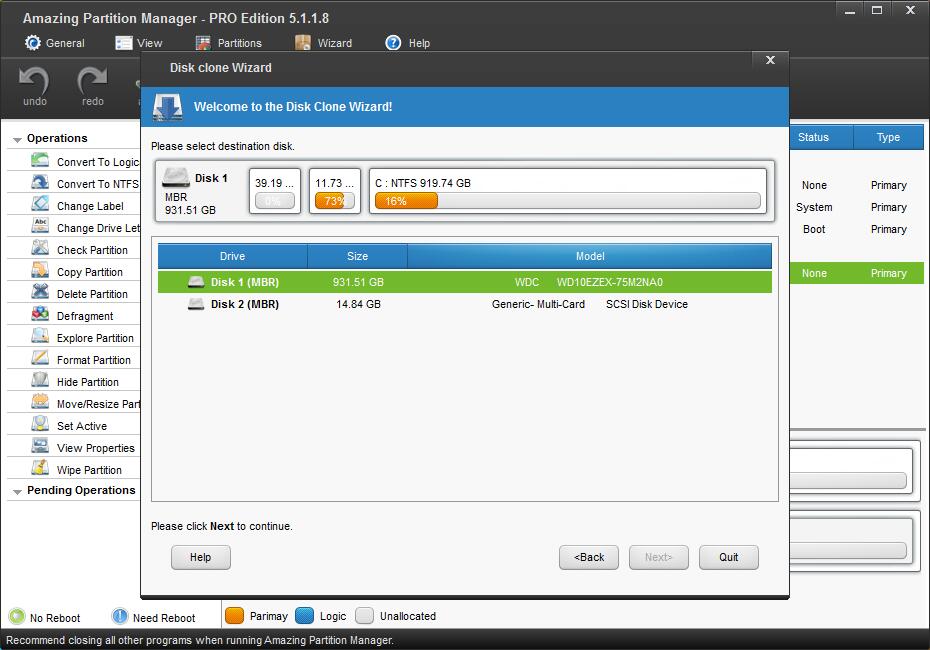
Step 2. Select the disk that will save all content on the source disk and then click "Next". Note: please backup all important data on target disk in advance, because all its data will be deleted.
Next, select "Destination" disk.
Step 3. Choose a copying method to decide the layout of target disk and then click "Next". Click "Finish" button to go back to the main interface. Click "Apply" button on the top left corner to apply pending operations.
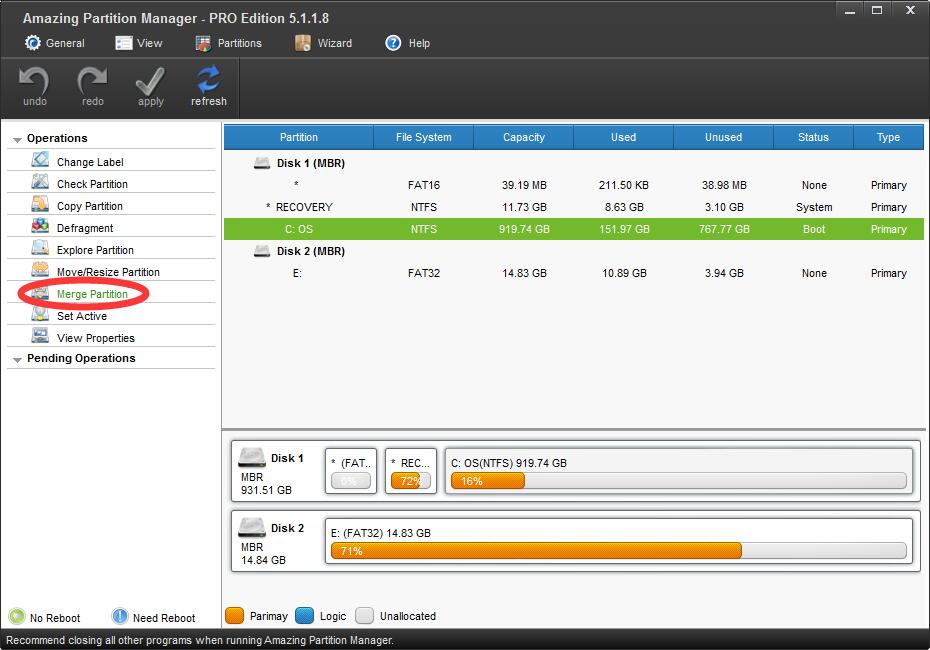
Part 10. How to Merge Partition
Step 1. Select the source partition and click "Merge Partition" from left action panel.
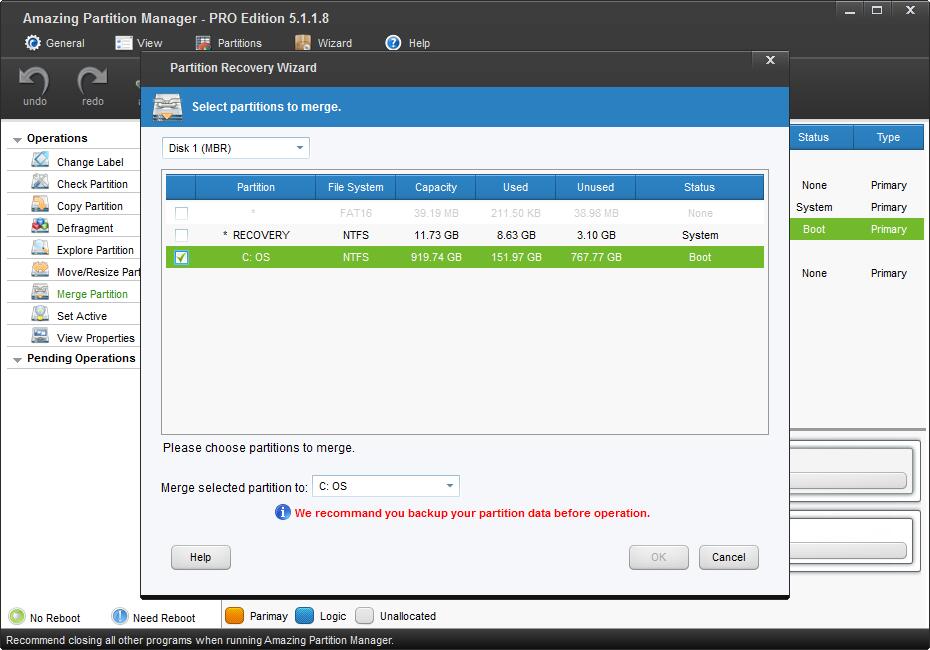
Step 2. Choose the partition which will be included to the previously chosen partition and name the folder which will contain the content of the selected partition. After that, click "Finish" button to go back to main interface of the software.
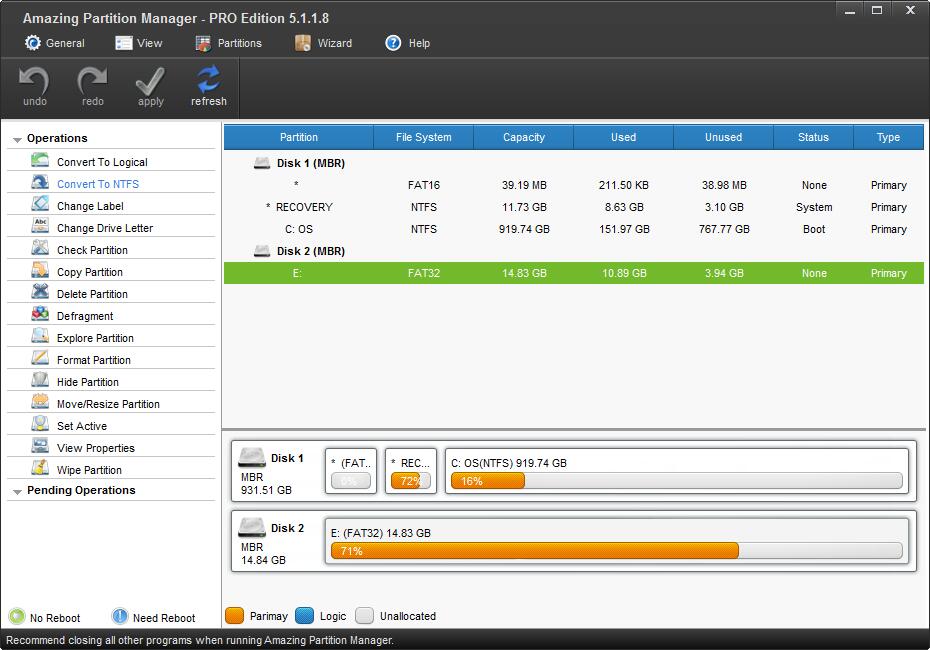
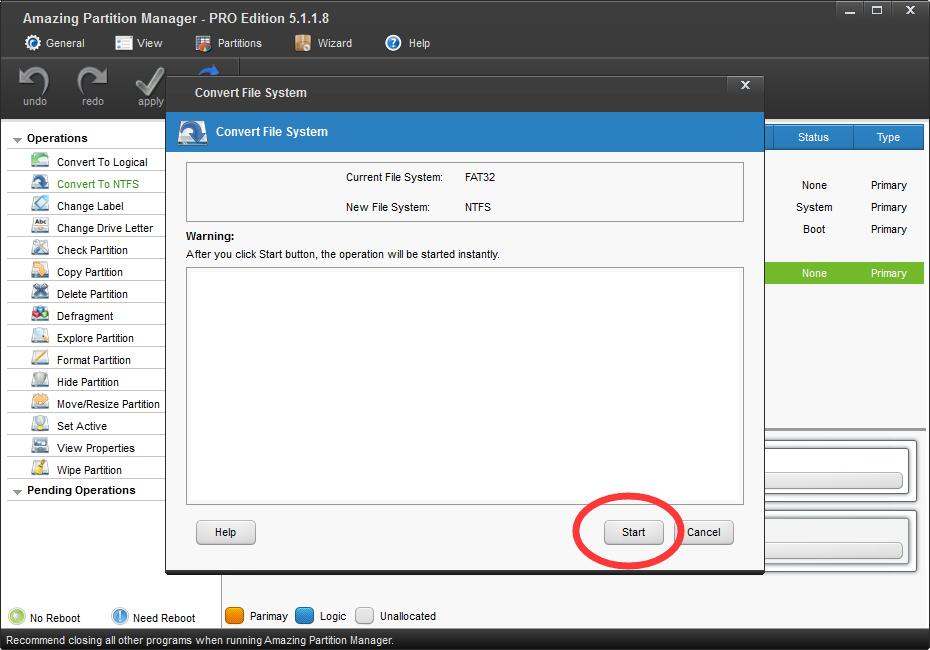
Part 11. How to Convert to NTFS
Choose the partition that you want to convert. .Initialize "Convert FAT to NTFS" function by clicking it in left "Operations" list. Click "Start" at the bottom of the operating interface to get conversion started automatically.
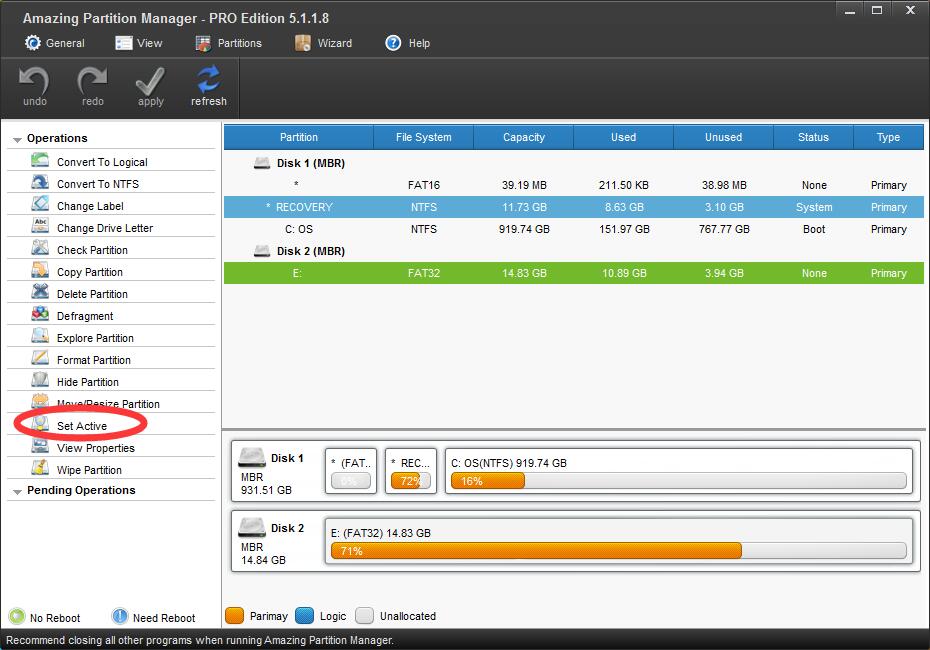
Part 12. How to Set Active Partition
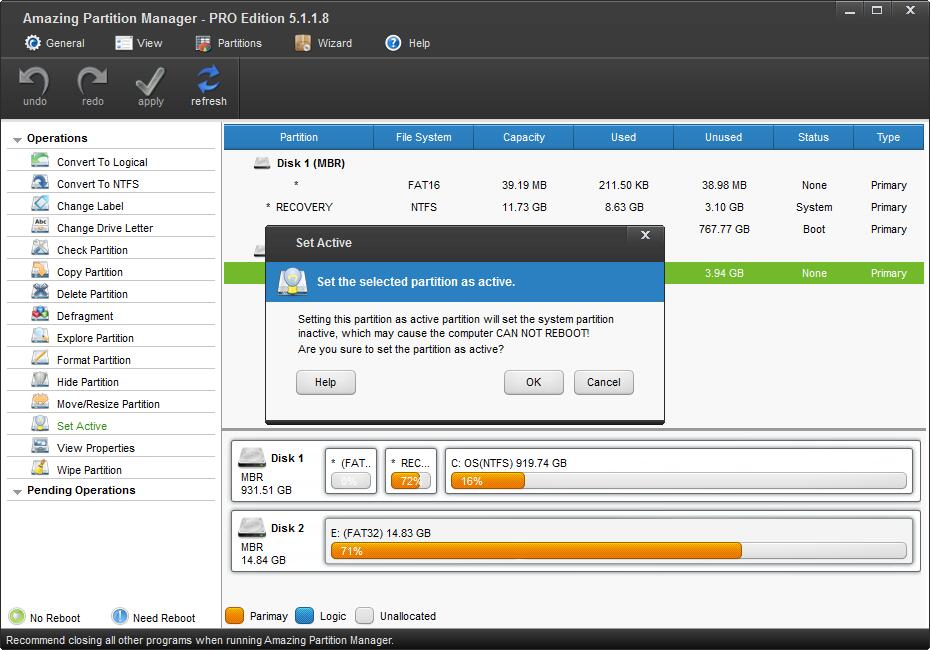
You may have multiple primary partitions (at most 4) on your hard disk drive, active Partition refers to a primary partition which contains boot files of the operating system. After you make a partition as active, the operating system will hence start from that partition. Typically, a disk can have one and only one active partition.
Before you do, make sure it contains the loader (an operating system tool) or boot files such as "boot.ini", "ntldr", "bootmgr" or "BCD" before you mark that partition as active. If there are other applications running on the partition which you are going to perform, AOMEI Partition Assistant will notice you to close those applications. Never make a partition which contains no system files as active. Doing so will cause your computer to stop working.
This operation can ensure absolute security for your data.
Step 1. Right click on the partition you want to mark as active and click "Set Active" .
Step 2. Click OK in the next step, the change will be presented in the main window.
Step 3. Click Apply to open the pending operations as shown in the screenshot below. You will get a "Reboot Required" warning, click Proceed to confirm. This operation will cause you computer to reboot, click Yes if you are ready to start.
Part 13. How to Hide and Unhide Partition
Hide Partition can be extremely useful when you have some confidential files or sensitive information on the local disk and you want others to stay as far away from it as possible. After you hide a partition, the partition will be invisible to all visitors until you manually unhide it. If one day you want to use it again, simply unhide it and it will then show up again in My Computer and Explorer.
Before you do, move the most frequently used files and applications that you don't want to hide from the partition which you are going to hide to other partitions.
Tips: This operation will hide/unhide your partition with its content intact.
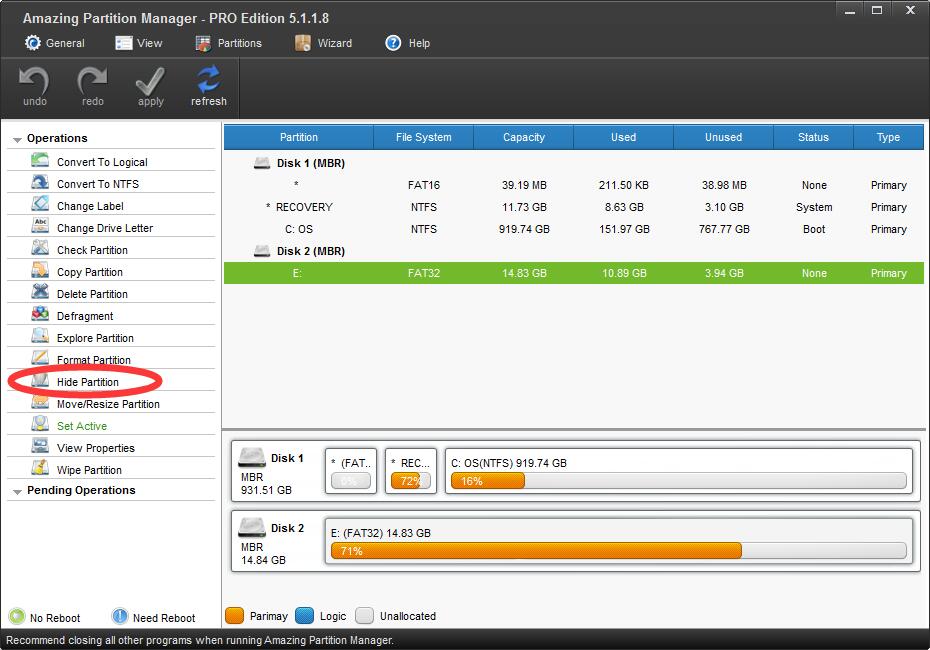
Step 1. Right click on the partition which you want to hide to open a pop-up menu. Then, click "Hide Partition".
Step 2. As a result of Step 1, you will get a warmth warning as shown in the following screenshot - "Hiding this partition may cause its drive letters to be changed. Would you like to hide the partition? " . Click OK to continue.

Step 3. Click Apply to execute the operation. After that, the G partition will be invisible to others, and it will be complete hidden from My Computer and Explorer.
Tips:
Unhide Partition shares the same operating steps with Hide Partition.
The hidden partition is unavailable for use until you unhide it.
After you unhide a partition, Windows will randomly reallocate a new drive letter to that partition. This means you may get a drive letter which is different from its original one.
Unhide a partition will cause its related shortcuts invalid.
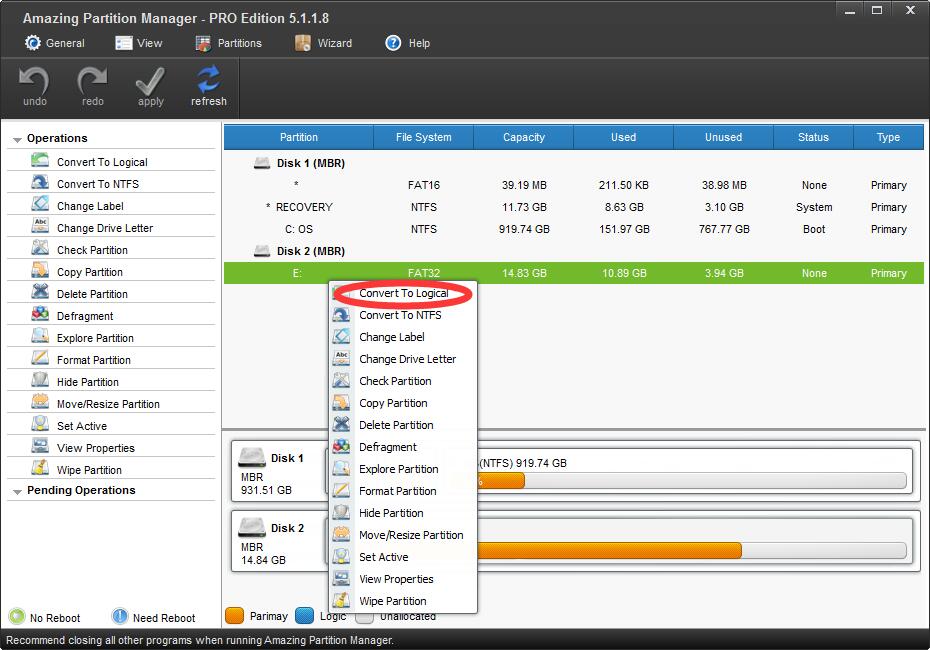
Part 14. How to Convert Primary Partition to Logical Drive
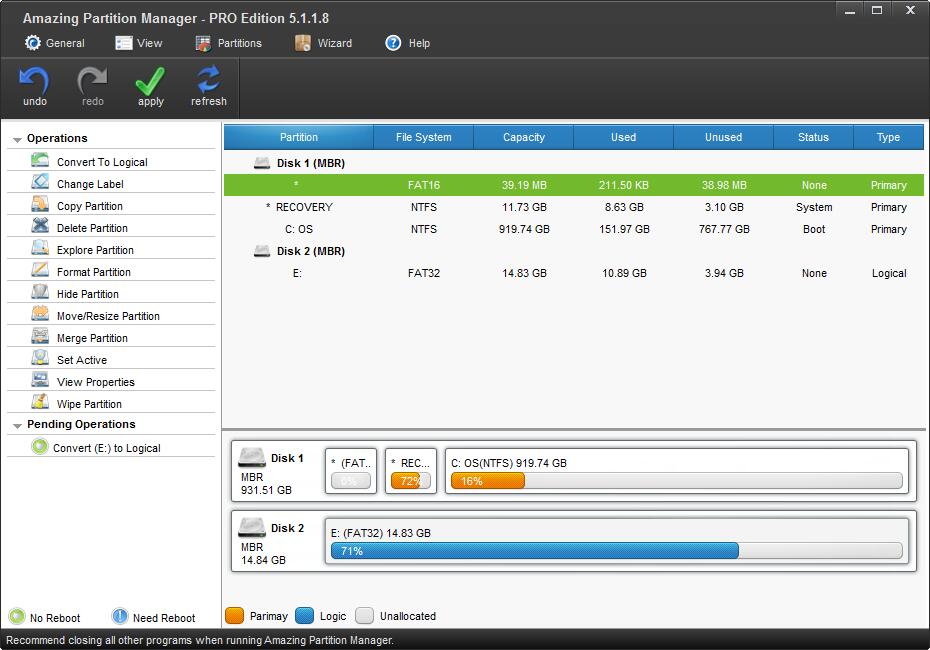
Step 1. Right click on the partition you want to mark as active and click "Convert to Logical".
Step 2. Click "OK" to confirm the operation in the following pop-up window. Commit the operation by clicking "Apply" on the tool bar.
Tips:
Convert primary partition to logical is mainly used on basic MBR disk.
You're not allowed to convert a boot partition to logical. Otherwise, you computer will likely to stop working.
The location and the size of the primary partition will be slightly changed after converting. Since the logical partition is 63 sectors bigger than primary partition.
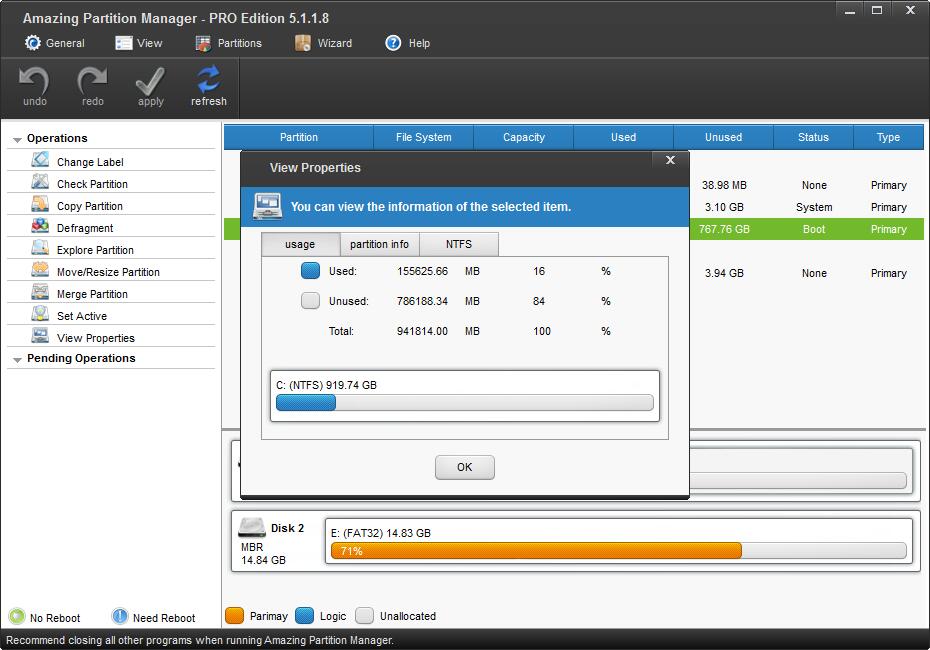
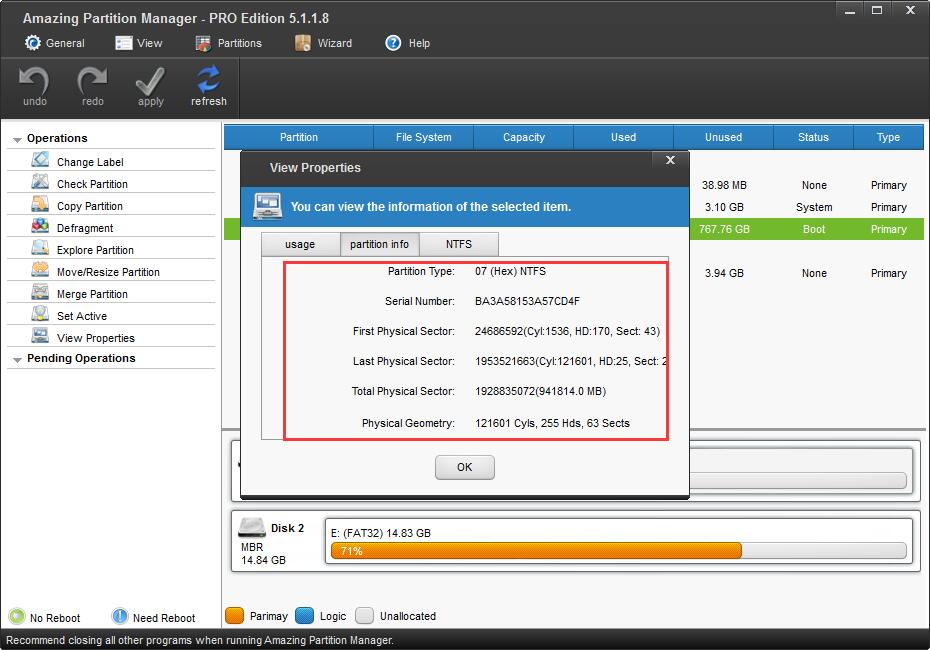
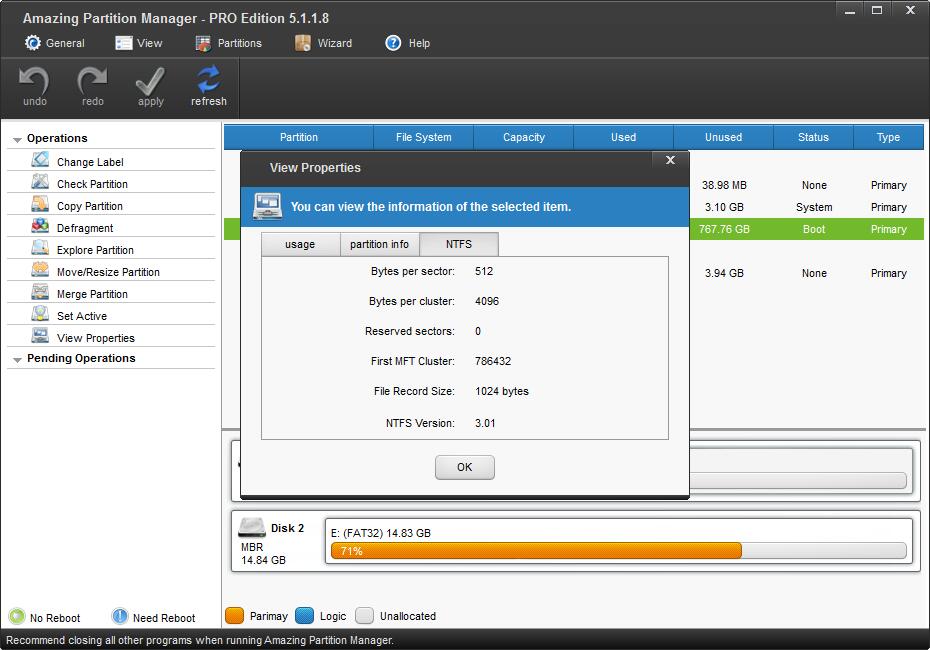
Part 15. How to View Partition Properties
"Partition Properties" will show you more details information about your partition, such as: Capacity information, partition information and file system information.
Step 1. Right-click the partition, select "Properties".
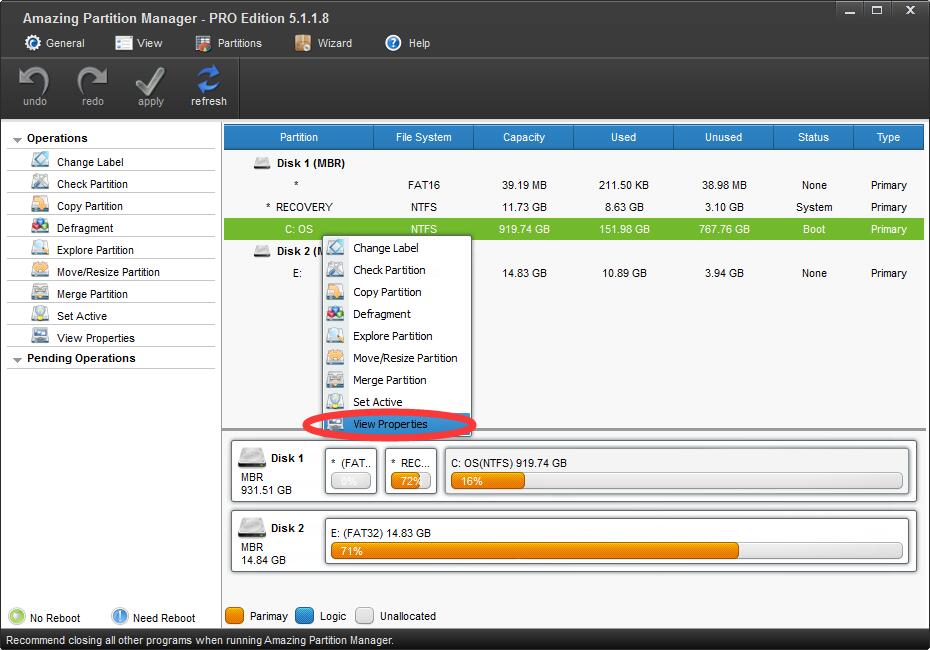
Step 2. In the pop-up window you could view all information about the selection partition.
Partition Capacity information. You can see the above Parameters such as: Total Size, Used Space and Free Space.
Partition Information. You can see the above permerters such as: Fils system, Physical total sectors, First physcial sector etc.
File System Information. You can see the above permerters such as: Bytes per sector, Sector per cluster, Sector of root directory etc.
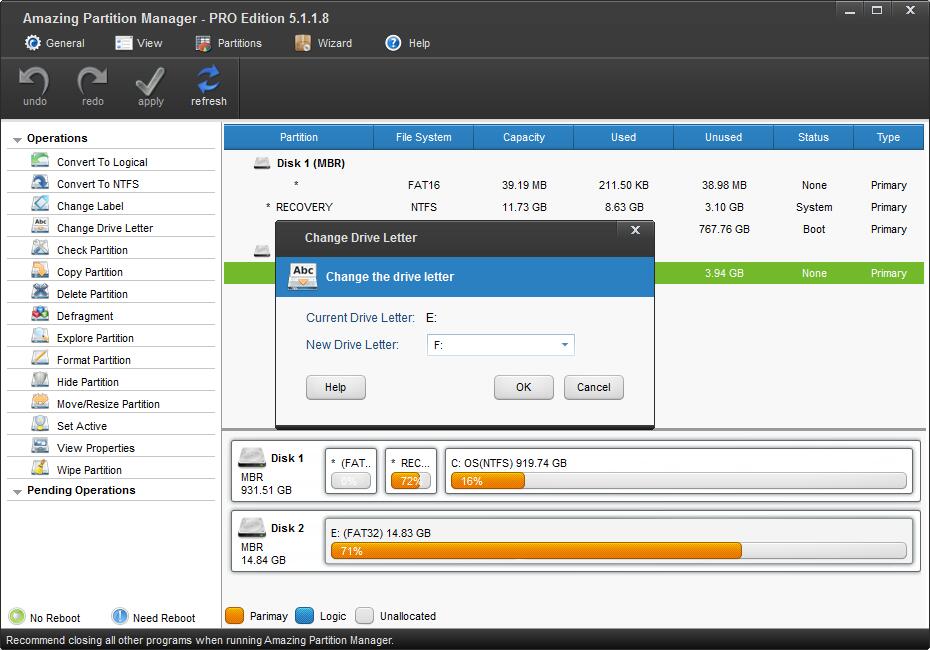
Part 16. How to Change Drive Letter
Change Drive Letter simply provides a way to assist you modify the letters according to your preference; D for G, E for H and so on.
Step 1. Right-click the partition, select "Change Drive Letter".
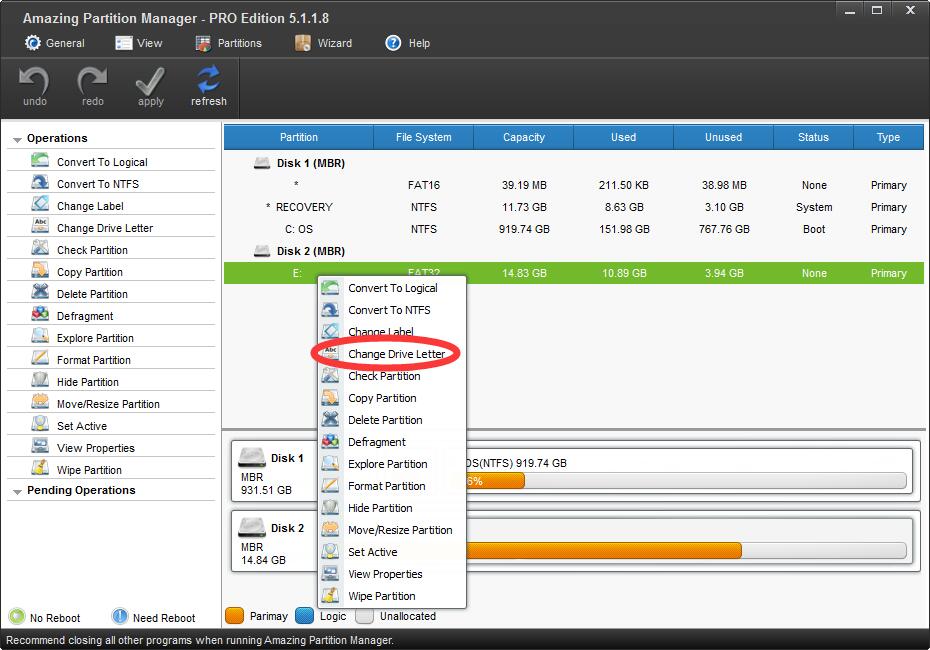
Step 2. Click the little box behind New Drive Letter to start a pop-down menu and choose whichever letter you like as your new drive letter (you can assign any letter to a drive so long as the letter doesn't take up by other drive, and the drive letter will be removed if you choose None as the new drive letter). Click OK after the new drive letter has been chosen, after that, the new drive letter will be represented in the main window. Click Apply to confirm this operation.